
UPDATE – I’ve now got a video tutorial for this on my YouTube channel. Feel free to still use this if you prefer it.
For those of you who want to create your own KEVA plank building destruction videos, you’ve come to the right place! In this tutorial I’ll teach you how I made the clips below using the 100% free and open source package that is Blender 3D. Its built-in Bullet Physics support makes this very easy, and my downloadable template file will get you started in no time. Check back soon for a tutorial on how to add more realistic materials and lighting, which will also be in the form of a video tutorial on my YouTube channel.
I might later make a tutorial on making these simulations from scratch, but I felt I should share my template to help you get started straight away. So let’s get started!
- First, download my template from blendswap and open it in blender
- You’ll notice a few things. Apart from the basic setup with camera, sun lamp, and a ground plane you’ll see:
- A pile of planks in the middle (which you’ll notice are 2 separate objects if you try to select them)
- A single plank next to them which should be green
- A weird contraption in front of them
- If you press alt-a to animate, the ball will fire forwards and the green plank will fall. The ball will collide with the ground plane but go straight through the planks in the middle
- We will come to these one by one, but let’s start with the planks in the middle that will form our building. Each object is a “sheet” of planks. Let’s select the bottom one and open the modifiers tab, where you should see 3 array modifiers.
- For this video I want to make a tall, thinner tower. So lower “count” in the first array (“Array Length”) to 5, and in the second array (“Array Width”) to 2. Do this for both “sheets”.

From top view (NumPad 7), it should look like this:

- Now for the height. If you scroll down you’ll see a third array modifier, “Array Height” which increases the height of the tower. It doesn’t matter what you increase this by as long as you do the same for both objects. I will set it to 20, which should give me a tower that looks like this:

- Now to add the physics. First, we need to separate the planks we’ve created with the array modifier into different objects. Select the first object, and apply all the modifiers by clicking “apply”. Next, go into edit mode (Tab) and hit “a” twice to select all vertices. Now press “p” to separate, which should reveal a drop-down box with an option to separate “by loose parts”. Clicking this will make each plank a separate object. Repeat this step for the second plank object.
- The green plank next to them is a plank which has the correct game physics properties assigned to it. Now you can select all the planks in the tower (go into top view, press “b” and drag a box around the tower), and press “add active” in the rigid body tab on the left. Now simply select the green plank while holding shift (this adds it to the selection) and click “copy from active” on the left, which will apply these settings to all of them:

If you can’t see this toolbar press “t”. In older versions of Blender (before 2.7) there might not be tabs like this but there will still be a section for rigid body tools which will have the “copy from active” option.
- If you press Alt-A now the Keva blocks will all move, but they will behave very strangely. This is because the origins are in the wrong place, which should be fixed. Select all the blocks in the tower again and press Shift Ctrl Alt C. In the drop-down menu that comes up press “origin to geometry” which should correct all the origins to the right place in the middle of their blocks.
- Pressing Ctrl-A now should give you a working simulation! The ball should fire at the building and knock it over. However you might notice some of the blocks on the top layer falling off the side, and the building might be a bit bouncy. Let’s fix the blocks falling off, which is caused by the outer layer not being aligned.
- If you go into top view you’ll notice the outermost layers hang over the edge. We need to fix these manually. Select the blocks hanging over the right with “b”:

- Now move them 1/3 of a unit left by pressing “g” then “x” (to move it on the x-axis) then “3”, “/”, and “-” to move it the reciprocal of 3, or 1/3, left. Do this for all other planks hanging over the top, left and bottom edges. Remember to use move the top and bottom ones in the “y” direction.

What it should look like when everything is lined up
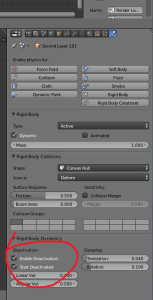
- Pressing Ctrl-A now will give a completely stable simulation, with nothing falling off the sides! Be patient, this might be very slow. If you have built a much bigger building it might still be bouncy, which can be fixed by enabling “start deactivated” which means the building objects are only affected by physics once they make a collision with something. This can be done in the simulation tab in properties, under rigid body dynamics. First tick “enable deactivation” then tick “start deactivated”. This will however only apply it to the currently active selected object and to copy these setting to all of them you will need to use the “copy from active” box we have used before.
We’re done! I used this template to make the majority of the Kapla / Keva clips in my video. If you make something cool, let me know in a message on YouTube or a comment on this blog. If you would like me to use it in future compilations I make, make sure to upload it as “creative commons” and I will be able to use it and give credit.
Just as a final tip, a lot of problems can be solved by increasing the “solver iterations” in the scene tab. If things are unstable, your tower is bouncy, things are falling when they shouldn’t, or things are going through the ground plane, this can usually be solved by increasing the iterations.